
 For more than 20 years I’ve made professional school communication and education marketing photography for over 1,000 schools, preschools and universities. What I’ve learnt is the most effective images are those that show the students and teachers to your community. Parents, including myself, want to see the culture of your school and that’s best demonstrated by seeing happy, engaged students.
What follows are tips to help improve the photography used to market your school.
1. Plan.
You’ve heard the saying, “If you fail to plan, you plan to fail”. Having a communications strategy will inform what type of images you need for your school. What are you trying to say about you school? Start by identifying your school’s key messages, what is special about your school?
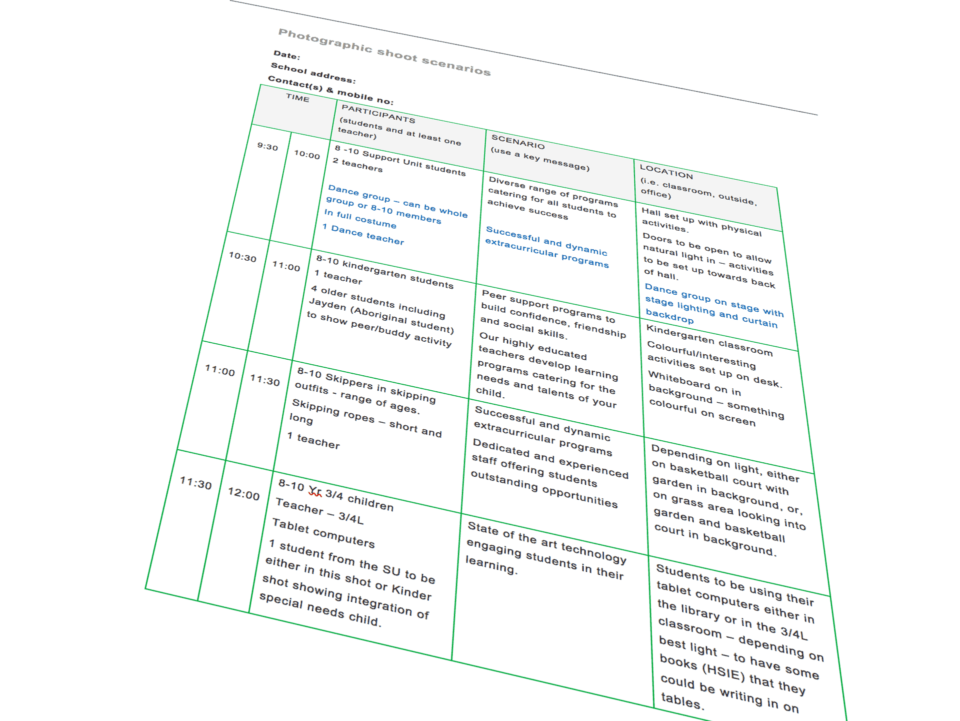
Plan the photo shoot. Make a spreadsheet with the who, where and when for the photography. Get signed permission for everyone in the the images, including those in the background, before the day of photography.
2. Illustrate Your Key Messages.
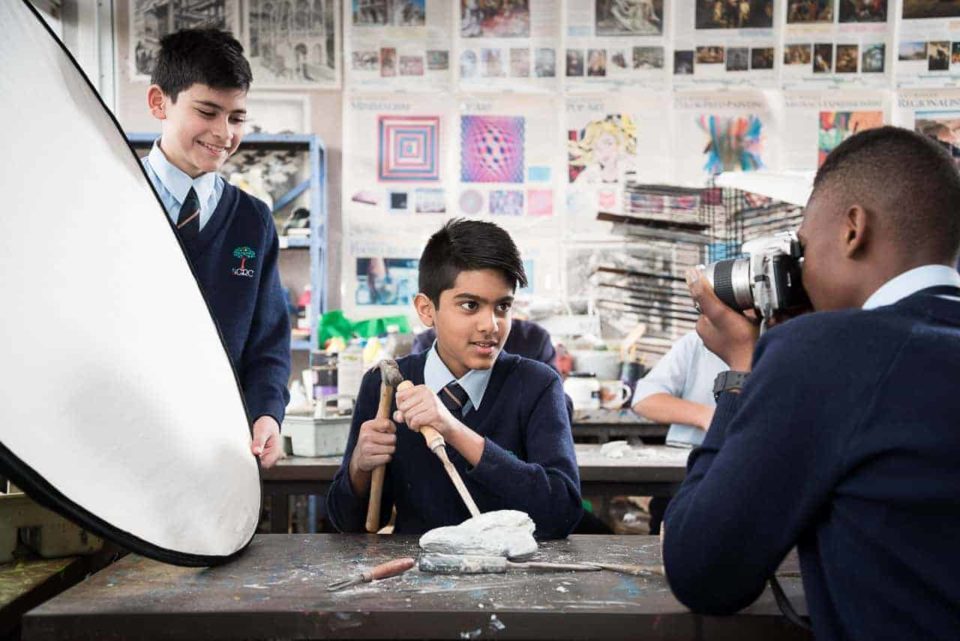
Your key messages are based on the strategy mentioned above. Think what sort of image will best show a particular message. For example, if a key message is you have inspiring teachers, don’t simply make a portrait of the teacher. Instead, photograph a teacher interacting with students.
3. Don’t Be Literal.
If you have award winning students don’t photograph them holding their certificates – unless it shows them actually receiving their award. Instead show the students doing what earned them their award: academic excellence, playing sport, debating, doing community work, etc.

4. Find Window Light.
On-camera flash is hideous and those green coloured, fluorescent lights in the ceiling will make anyone look alien. Turn off the flouros and set up your photography near the windows. Find rooms that have the best window light and see what time of day is best. Open the blinds and doors to let in daylight.
5. Use A Reflector.
Once you have set up near a window the light will be coming from one direction. Balance it by reflecting light from the opposite side back onto the subject. Find a large, white surface to use as a reflector such as a mobile whiteboard, sheet of cardboard, etc, at least A2 in size.
There are professional, twist-fold reflectors made specifically to do the job. This is the single piece of equipment that will greatly improve your school promotional photography. They range in price from $20 for a simple reflector and it’s all that’s necessary for professional results. The reflector should also be used for your outdoor scenarios including portraits and group photos.
Bonus Tip!
Include advocates for your school. Professional portraits of parents, guardians, successful graduates, community members such as grandparents will put a face to people who love your school as much as you do. Advocate portraits only take a few minutes of their time.
Typically I’ll make these portraits soon after school drop off when parents are at school, outdoors in flattering light with a simple reflector. Include the student with their parents and you can even send a photo to the family as a thank you.
When you next refresh your portfolio of images, which you should do regularly, keep these tips in mind. If you have any questions feel free to reach out to me by email or phone.